In this tutorial, we implement a ROS 2 subscription using TypeScript and learn to use the ros2 topic CLI tool for listening in on and testing pub-sub communications.
edited 20220211 — upgraded to use NodeJS 16
In tutorial #2 we learned about ROS 2’s publish-subscribe communication mode and how to create a simple ROS 2 node and publisher using the rclnodejs library and TypeScript. In this tutorial we introduce how to receive messages using a ROS 2 subscription.
ROS Messages
In this tutorial and the previous tutorial we are working with the simple ROS String message. ROS 2 includes a rich set of standard messages which we will introduce in up-coming tutorials. Resources section below includes a link to the standard ROS messages. ROS messages are formally defined using the Interface Definition Language (IDL). The ROS 2 SDK includes tools for creating programming interfaces from message IDL files.
Here’s the IDL definition of std_msgs/msg/String that we are using. Note how it only has thedata field:
string dataLet’s Code
Some details about this project. The program will consist of:
- a ROS Node that manages the life-cycle of a subscription and all of it’s communications
- a ROS Publisher of string messages to the topic
msg - when a message arrives the subscription will print it to stdout
- the program will run indefinitely until the process is manually terminated, e.g., Ctrl-C from shell
Prerequisites
Getting started you’ll need a dev environment with
- Nodejs 10.22–17.x — I’m using Node 16.13.0 (LTS)
- ROS 2 Foxy (LTS) or Galactic release
If you haven’t setup your ROS 2 JavaScript coding environment see this article.
Lastly if you would like to skip ahead and see the end result, you can find a link to a github project in the Resources section found at the end of this article.
Step-1: Project Setup
Project setup is easy as we will continue developing our code in the Nodejsros2-js-examples project we created in Tutorial #2. From the root folder of our ros2-js-examples project create the src/example2 folder using the following Linux commandline tools.
mkdir -p src/example2
cd src/example2
Step-2: Creating a Node and Subscription
Create the file node-subscriber.ts file.
Here’s a quick explanation of the key lines of code:
Line-14: Create a ROS 2 Node with the name node_subscriber in the ros2_js_examples namespace.
let node = rclnodejs.createNode('node_subscriber','ros2_js_example');Line-15,18: Create a ROS 2 Subscription that listens to the msg topic for a message of type std_msgs/msg/String. The subscription is configured with a callback that simply echo’s the message’s data property to the stdout.

Line -23: Inform rclnodejs to begin routing incoming messages to this node.
rclnodejs.spin(node);Step-3: Compile TypeScript
Invoke the TypeScript compiler tsc to transcode our node-subsciber.ts file into JavaScript. The resulting JavaScript file is created in the dist/example2 folder with the same name as it’s src TypeScript file.
npm run buildor for continuous compilation on file changes use:
npx tsc -wStep-4: Run
Using the Nodejs runtime, let’s run our node-subscriber program. In your terminal shell enter:
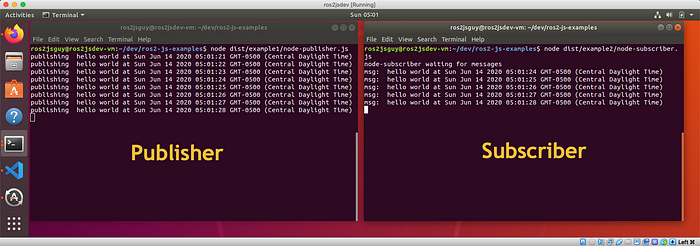
node dist/example2/node-subscriber.jsInitially not much is happening, as the program is waiting for messages to arrive.

Now let’s run node-publisher to generate messages.
To do this open a new terminal shell and change directory to the ros2-js-examples/ folder. Then run the command:
node dist/example1/node-publisher.jsOnce node-publisher is running and publishing messages, you should see subscription messages begin dribbling to stdout as shown below.
Using The ros2 topic Tool To Test Pub-Sub Messaging
In tutorial #2 we got our first look at how the ros2 CLI tools can be used to listen to published messages. Now let’s take a look at how we can use the ros2 topic tool to publish a message to a topic and subscribe to that topic.
Publishing to a Topic
Open a new terminal shell and enter:
ros2 topic pub /ros2_js_examples/msg std_msgs/msg/String ‘{data: hello world}’The topic tool will startup and repeatedly publish a ‘hello world’ message every second until we terminate the process.

Subscribing to a Topic
Next, open a new terminal shell and enter:
ros2 topic echo /ros2_js_examples/msg std_msgs/msg/StringThe topic tool will listen for published messages on the /ros2_js_examples/msg topic and echo the message to stdout.
Note that because the node operates in the /ros2_js_examples namespace we need to prepended the node namespace to the msg topic name when using the ros2 cli tools.
Using the ros2 topic tool is a convenient way to test publishing and subscribing to a message.

Parting Thoughts; Looking Forward
Anonymous pub-sub communications is the simplest ROS 2 communications mode to implement and typically the most common form of communications in the node graph. In our next tutorial we introduce the ROS 2 rviz2 visualization tool and put pub-sub communications to work.
Resources
Please consider liking this tutorial and following me here and on Twitter @ros2jsguy